
Start video consultation from a case
Video consultations can provide additional information to your assessment of the patient. For a video consultation both you and a patient need to be connected at the same time. Evaluate what is the best workflow for your unit, asynchronous chat communication or a video consultation.
How to start a video consultation
- Go to the case view for a patient.
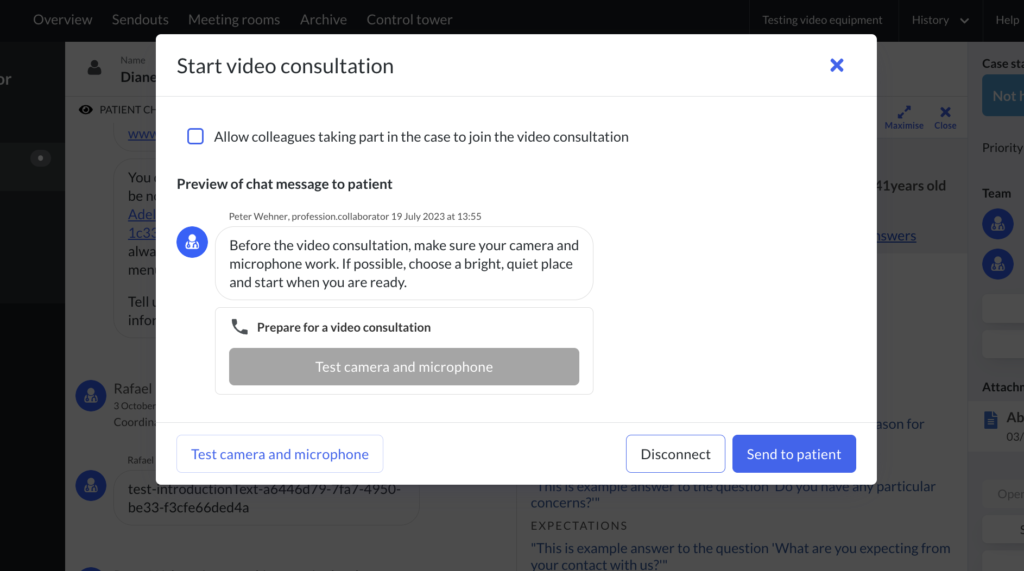
- Select “Start video consultation” in the tool panel.
- If you need other colleagues(s) to participate in the consultation, check “Allow colleagues to take part in the video consultation”. (It is possible to invite a colleague during an ongoing video consultation.)
- If you need it, you can test your camera and video before sending the information to a patient. You can also access this in the main menu. If it is the first time you might be asked to give the browser access to your camera and microphone.
- Send the information.
Note, that it is not possible to change owner during an ongoing video consultation. If a specific colleague want to share screen during the consultation, they need to be the owner of the case.
Once the information has been sent to a patient
The patient receives a link to the video consultation. First they are asked to test their camera, microphone and internet connection.
If either of them do not work, they will see suggestions on how to make them work and which browsers that are not supported. If they can not solve their problems, the patient may decline the video consultation. Video quality tips and tricks.
Test of microphone and camera
If the patient selects no to “Do you see yourself?” or “Does the bar move when you talk?” they can read help pages on how to solve the problem.
Test of internet connection
The patient’s internet connection is tested. The test takes 15 seconds and gives the patient an indication of whether the consultation will be affected by a frozen image or a chopping sound.
The patient consent to being ready for the video consultation
The activity panel shows the status of the patient until they are ready to start the consultation.
Stages of a patient’s status:
- Video: equipment check sent.
- Video: patient tests equipment.
- Video: patient is ready.
- Video: consultation interrupted (if the patient chose to decline the video consultation during equipment check).
- When the patient has completed the equipment check and given consent to start the consultation, the platform will automatically start the consultation. You will see and hear the consultation start – regardless of which page/view you are on.
- You can choose to:
- Start the video consultation.
- Decline the video consultation.
- Close the popup – and start the video consultation from the chat.
Ongoing video consultation
What you can do during a consultation:
- Turn off the camera.
- Turn off the microphone.
- Share screen (when you choose to share screen, you have the option to choose which screen (if you have several) or which window you want to share. The screen will change to full screen so that you do not share sensitive information).
- Maximise/minimise the window with the video.
- Move the window with the video and place it in an optional place on the screen.
While participating in a video consultation you can also:
- Write and send files/questionnaires in the chat. The patient can not see this until the consulation has ended.
- Write in the team chat.
- Add/remove colleagues.
- Create a new Sendout to the patient.
- Get a link to the case documentation.
- Flag the case.
What multiple caregivers can do during video consultation:
- When one or more colleagues are in the video consultation, all cameras are displayed at the same time.
- Maximise/minimise the window with a specific participant.
- Colleagues who participate in a consultation but are not the owner – can not end a consultation – just leave it.
- The owner of the case can share screen.
What the patient can do during a consultation:
- See the name and professional role of participating caregivers.
Updated on 2023-07-19